Sunday, December 31, 2006

DiggiBobbiE

Happy Holidays Everyone!!

Sorry I haven't blogged for a while. I've been taking a bit of a break over the holidays. I hope that all of your holidays were wonderful and filled with happiness. I know that our holidays were wonderful. The boys were thrilled with their gifts and that their Granny was there to spend the holidays with them again.

I found a new to me Vid Cast by Bonnie McCaffery. She does wonderful work with fibers and with her digitized bobbin work called DigiBobbE where you put decorative threads in the bobbin and do the surface embellishment up-side-down. You need to have a separate bobin so that you can play with the bobbin tension since you are putting some pretty thick threads in there. Since the threads don't have to go through the needle you can put whatever you want in the bobbin.

Well I was very inspired by a picture of some jeans that she embellished using DigiBobbE, and since I own two of her DigiBobbE sets, I decided to take a pair of my jeans and give it a try.

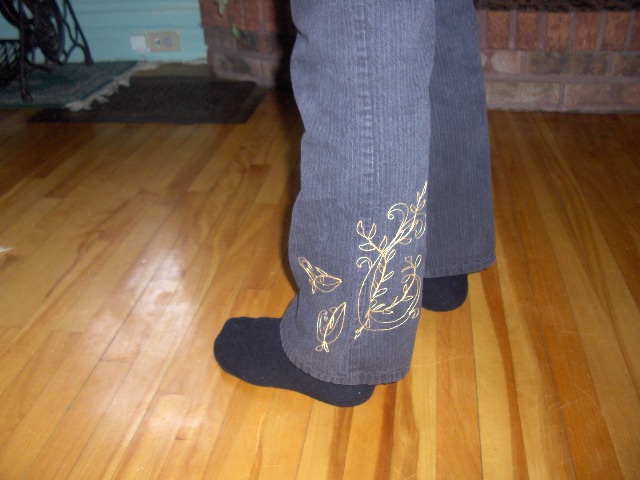
Here is the embellished leg. I have always wanted to do this but I have never had the nerve to do it yet :) Jenny Haskins does this all the time and I have always been tempted.

I unpicked the stitches up the inside of one of the legs and spread out the opened leg. Then I hooped the fabric and embroidered up-side-down. It's kind of exciting to not be able to really see what is going on :)
Here is the DigiBobbE embroidery that I did on the back pocket. Yes I embroidered over the edge of the back pocket. I really don't use my back pocket anyways; however, you can take the pocket right off and put an embroidery on the pocket then sew the pocket back on. I liked the idea of the embroidery wrapping around the pocket so I left the pocket on. These embroideries are very quick to run since they are just line drawings.

Hooping the back pocket was a bit challenging but I think that it was worth it.

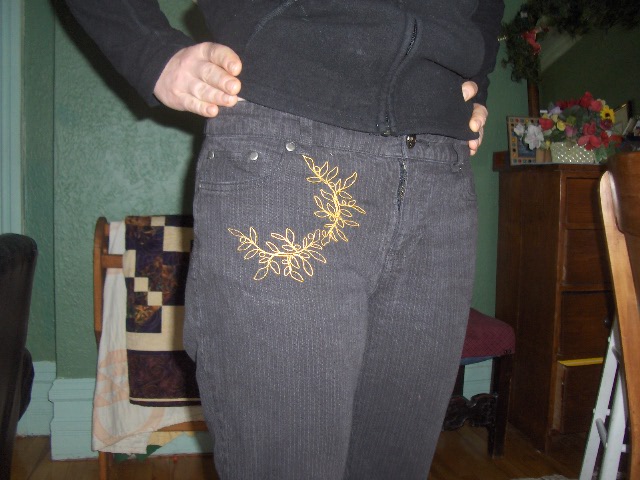
Here is a picture of the front pocket. Hooping this was a little bit more difficult but I just love the way that it looks.

These were an old pair of jeans that I didn't really care if they ended up in the garbage but now I think that they might be my new favorite pair.

You can also do bobbin work without an embroidery machine. You can do this free-motion or using a preprinted pattern. Bonnie McCaffery does really nice demo on DigiBobbE that I really recommend that you watch if you are interested.

So what do you think? If you have any questions please feel free to post them here and I will try my best to answer them.

Wednesday, December 20, 2006

Free Standing Lace Ornaments and Yummy New Fabric

I am STILL finishing Christmas gifts!! When will I learn??

This is a picture of the Free Standing Lace (FSL) ornaments that I am making for my boys' teachers. I hope that they like them :) They are from Embroidery Library and they are the 3D Lace collection. Very nice don't you think?? They take a couple of hours to run on full speed each and I use a cotton pre-wound bobbin for both the top and the bottom thread so that they have a nice delicate look to them. I use Ultra Solvy as a stabilizer for them and I have never run into any problems.
I just had to show you a picture of the wonderful Hoffman pointsettia fabric that I got from my LQS at 50% off! I am such a sucker for Christmas prints and this one has everything that I like :) It's a nice bright red print with green and gold metallic so what's not t like?? I got 4 meters so that I could do lengthwise borders and put some in the blocks as well. It's not like I "need" another Christmas quilt but if one just started to appear out of my sewing machine I wouldn't be upset :) I mean really the guest bed needs one too doesn't it?

Tuesday, December 19, 2006

Good mail day and pin cushions

Sorry for not posting for a bit. I have been crazily sewing for Christmas. I think that all quilters get a little bit bogged down by all the sewing near Christmas. Every year I promise that I am going to start earlier and not have any sewing to do by the end of Decemeber and every year I scramble to finish "just one more little project gift." Someday I will learn. My promise for next season is to have all my fabric postcard Christmas cards finished by Novemeber and mailed out by the end of Novemeber of the very beginning of December. I'm not sure if I can keep this promise though :)

I had a great mail day today! Look!! I got my Electric Quilt 6 upgrade software. I am really excited by this! Even though I don't use EQ as much as I should I know that I want to design more of my own quilts so when the upgrade became available I I just had to get it.

I also got the postcard stamps I posted about previously. I first saw it on Jeri's blog and she was kind enough to share with me where she got her's from. I received mine from Puzzle Postcards and More via their Ebay store. It is a Victorine Orginals stamp and you can get it from their site as well (for a couple of $$ more). They look really nice and I can't wait to use them; although, I am a complete stamping newbie LOL!
I've also been making some pincushions for some small gifts. Joyce was kind enough to post the pattern on her blog and they work up really nicely. I've only had mine for a couple of days now (it's the one with the scissors sticking out of it) and I LOVE it for hand sewing in front of the TV (ie binding) because it holds your thread, clips and thimble all neat and tidy and it has a little pincushion on top. I think that a few of my sewing friends will enjoy receiving these for holiday gifts. So thank you so much for the great directions Joyce!

As an aside - Joyce made a great sweatshirt jacket from my instructions so if you want to see a spectacular jacket go check out her blog.

Friday, December 15, 2006

The Last of the Postcards

Well here they are. The last of the postcards that I am going to send out this year. I really like the way that they turned out :) These ones are all in blues except for the bear card that I sent out to my Mom. She likes bears a lot so I thought that this would be a good card to send her.

I ordered a postcard stamp for the backs of the cards from ebay. You can see it here if you want. I haven't received it yet but it looks nice and other than that I don't know anything more about it :)

I hope that all these cards get through the mail okay :)

Sunday, December 10, 2006

Creative Frenzy and Christmas Fabric Postcards

I had so much fun today with this! I am making fabric postcard Christmas cards to send to our friends and family. You can see a picture of my creative frenzy here. Well, actually, I did clean it up a bit because it really did look pretty messy.

You can see my thread leftovers from machine quilting and embroidery. I save these in my zip-lock bags for future projects along with any snippets of batiks and hand dyed fabrics (anything that looks good on both sides). You can also see my various embellishments like yarn and confetti.

Here's a closeup of the cards. Here's how I did them.
1. I fused a piece of fabric onto Timtex
2. I layed various thread bits and little bits of Christmas fabrics on top.
3. When I was pleased with how it looked I layed some confetti on top. I put some snowflakes, stars and circles on top. You can get these at party stores where they are sold as table decorations..
4. I put a piece of tulle (I used green here) over top to hold everything down.
5. Machine quilt in a random pattern with invisible thread on the top. This is just to hold everything down. I even quilted over the confetti to hold them down and it wasn't a problem.
6. Cut this to 4" x 6" for postcard size.
7. Fuse a piece of muslin onto the back the same size.
8. I zigzag stitched around the edges to seal it all in but there are ther finishing methods.
9. Then I went around the edge again with a loose zigzag to put the finishing fluffy yarn around the edge.
10. Write your address etc on the back and you are finished :)

I hope that you all enjoyed seeing my cards :)

Now if I can just get another 15-25 of these done . . . and mailed out . .

Saturday, December 09, 2006

Fabric Postcards

Thank you all for all your nice comments about my last jacket. I like how it turned out too.

Here's a picture of a couple of fabric postcards that I finished today. The first one is from a paper peiced cat block that I made about 5 years ago and didn't have anything to do with it. I added some borders and put some funky trim around the edge. I know that it's not Halloween anymore but I really like how it turned out. I have another little cat leftover so I'll have to think of another idea for it.

The second card used some oriental scraps up. It's almost too nice to send out :) Both cards are quilted in gold metallic thread.

Friday, December 08, 2006

The completed jacket experiment

Tada!!
Well, here it is the completed jacket experiment. This jacket actually turned out a lot better than I thought it would I must admit :)

What do you think??

I did the cuffs again like I did on my Christmas jacket. You can see the method here. As per my husband's advice I added an oriental style collar to the jacket. I lined the collar with interfacing but I think that I should have put some batting in it so that the thickness would be the same as the jacket.

I really like the way that the red flows across the jacket so well and how the sleeves are incorporated into the overall design. I also like the way that the two sides of the front are joined together. I quilted it in red cotton thread in a whatever I felt like doing sort of pattern :) I like quilting that way a lot. I do a few waves, some flames, some spirals maybe some bursts etc and it is done. Since I wasn't sure if I would actually like the jacket :) I just let loose and did what I felt like.


Here's how I did this one. I opened up the sweatshirt only under the arms and left the sleeves on. I spray basted the sweatshirt to the jacket using 505 Spray baste and then I cut away the ecess fabric under the arms. Then I turned it over and quilted it. I have to say that quilting the jacket was more difficult this way since I had the huge seams on the arms to try and quilt over. This was a huge drawback of doing this method. Another drawback is how much of the quilt top got cut away and wasted; however, if you have a top that is already made like I had it is a great way to use it up.

Here's a closeup of the neck hole in the sweatshirt. This was also hard to manouver since I had to bunch it up a bit and pin it down to keep it from shifting. I wanted the neck to be right in the centre of the red spiral and it gave the jacket a neat effect.

After I finished quilting the jacket I trimmed away the excess fabric, cut up the centre of the front, cut off the ribbing at the neck and sewed up the seams under the arms.

All in all I am pretty happy with the way that it turned out and I think that for a $0.50 purchase at a yard sale it's pretty nice. I think that it would be really funny to be walking down the street wearing it one day and have someone stop me and say "Hey that's my quilt!!"

Tuesday, December 05, 2006

Another Makower Advent Calendar and Blog Thing

Here is a picture of the first Makower Advent Calendar that I made. You can see the second one here. I love the Makower calendars and I love being able to put my own stuff in the calendars instead of putting chocolate or candy in them. You can put ornaments or things like that in them as well. My boys just love them.

Now all that said I have a confession to make . . . I bought the boys different advent calendars this year. I bought these really neat Playmobil advent calendars from our local toy shop. The advent calendar is a cardboard wallhanging that has boxes on it that contain small pieces to the set. Each day they get another small toy that goes into a cardboard scene. On the 24th they get the Santa that completes the scene. They have been loving it and to be honest it really wasn't more expensive then filling my own calendar. I figured that they won't be this age for much longer when a small Playmobil cat with just excite them so much. Hey maybe this could be MY advent calendar and everyday I could get say. . . a pack of needles, or a spool of thread or a small sewing tool??!! What do you think? The only problem is that I would probably have to fill it myself :) Oh well.

Here is another funny blog thing that I thought was pretty cute :)


You are The Star


Hope, expectation, Bright promises.


The Star is one of the great cards of faith, dreams realised


The Star is a card that looks to the future. It does not predict any immediate or powerful change, but it does predict hope and healing. This card suggests clarity of vision, spiritual insight. And, most importantly, that unexpected help will be coming, with water to quench your thirst, with a guiding light to the future. They might say you're a dreamer, but you're not the only one.


What Tarot Card are You?
Take the Test to Find Out.

Sunday, December 03, 2006

I'm making it!

Thank you everyone for your encouraging comments about turning the quilt top into a jacket. I'm making it now. It's almost done but I am going to wait until the binding is finished to post a picture. So far this method has some pluses and minuses that I will go over in my next post. I don't think that this will be a favourite jacket of mine but you never know it just might :)

I'll keep you posted. And again thanks for all the encouragement.

Saturday, December 02, 2006

Garage Sale Find and Possible Sweatshirt Jacket

I am glad that you enjoyed the tour of my sewing room :) And, thank you for all your nice compliments. I am very lucky to have such a big bright room dedicated to my sewing. Now if I could just get it painted I will be really happy :)
A few years ago at a yard sale I found this incomplete quilt top. Well, I hate seeing something like this get tossed in the garbage and I thought that it might have some potential so I bought it for $o.50. The woman thought that I was nuts :) I think that she was selling someone elses stuff. I had no idea what I was going to do with it at the time but I figured that someday I would do something with it. Well yesterday I got the idea that this might make a pretty cool sweatshirt jacket. What do you think? Instead of completely cutting the jacket apart for this one I will just slit the sweatshirt under the arms to open it up and lay the quilt top on top and quilt it. It might just work. I think that I will put the neck hole right about in the center of the red in the middle and put the arms along a red line each. I have a black sweatshirt that I love that got some bleach on one of the arms so it would be a good candidate for this jacket. That way if it doesn't work out I would be out a lot of $$$ for this experiment. Anyways, am I nuts for even considering this or is it a good idea? I think that I need some validation here :)

2022 Christmas T-Shirt Quilt Gift

As promised - here is the T-Shirt Quilt Christmas Gift from 2022! I did share this on my Facebook page but not on my blog, (whoops sorry!) s...