Hi all;
We had out quilt guild final meeting for the year last night. Wow what a great meeting :) We had a potluck appetizer type of buffet and the judging to the challenge last night.
The challenge was neat. We had 32 people enter so the challenge got divided into two groups. Out of the groups of 16 we all had to submit one meter of fabric. The next month we got back 1/16 of each of the meters of fabric. We were allowed to add one neutral and one other fabric.
This is my entry into the challenge. It is a pattern called "Magic Circles' from the book Scrap Frenzy by Sally Schneider. The pattern appealed to me since I teach pilates and we use a tool called a magic circle. The rings are mostly the different fabrics but my "other" fabric is in the rings as well. The neutral is the cream background fabric. I hand quilted this quilt 1/4" outside of every seam in the background and on a diagonal in the border. I didn't place but I had a lot of fun with the challenge especially since I didn't find myself inspired by the fabric so I had to come up with something that would be usable later and that I would like.
What do you all think? :)
Thursday, June 21, 2007
Wednesday, June 20, 2007
UFO #15 for 2007!
Hi all;
I have been off my UFO challenge for a while but I did manage to finish another one. This quilt is made up of triangle in a square units that I made when I was demonstrating the Eleanor Burns Triangle in a Square ruler. I had planned on making a much larger quilt initially but I lost interest in the project and these blocks sat in a bag for 3 or so years. I needed to make a baby quilt so this seemed like a good use for the blocks. I didn't have enough of the fabric on the border so I came up with this design to use up some more blocks too. I think that it looks pretty funky. I'm not sure if you can really see the quilting but I think that it looks pretty funky too :) I almost don't want to give this one away.
15 down and only 18 more to go :)
Tuesday, June 19, 2007
Fabric Dyeing Workshop
I took a fabric dyeing workshop on the weekend from a local hand dyer named Elaine Quehl. Her fabrics are wonderful and she has been dyeing for many years so I thought that a class from her would be great :) I like to take classes like this from people who have been doing it for quite a while and whose work I have seen before. I wasn't disappointed! It was a great class. I have done some dyeing before in the brights so when I took the class I decided to dye the "earthy" 12 step colour wheel. They are pictured on the top. We also did some direct application dyeing using all kinds of colours. They are on the bottom.
At the beginning of the class we were given some socks that had been scoured and prepared for dying. This was in case we spilled any dye on our feet. Well, if you can believe it no one did so we had to do some direct application dyeing on our socks to get them coloured. Pictured is my oldest son posing with the socks on. They look pretty cool :) Personally, I prefer lower socks so if I do that again I'll get some shorter socks LOL! I love the effect though.
I've had some PFD (prepared for dyeing) fabric for a while now just waiting for me to get some inspiration to start dyeing again so hopefully this will give me the kick that I need :) UPDATE: I dyed 7 meters of fabric today with the dyes that were left over from class. No one else wanted to take them so I said that I would since I knew that I had everything ready to dye. I'll see how they turn out tomorrow.
Another UPDATE:
Here are the one meter cuts of fabric that I dyed from the left over dye from the class. I used the same "baggie" wet application technique for these ones and wow do I love the colours. I was really loose with the formulas and just added a bit of this and a bit of that to the baggies. I really love that blue and I love the second red :) Some of the baggies had more of the soda ash solution added to them then others since I was running out. Likewise, some of the baggies had more dye in them than others. I love the freedom of dyeing and the experimentation.
This is a two meter cut that I dyed in the direct application method of dyeing using the little bits of dye that was left after I finished the above pieces. I added a bit more water to the dye solutions to dilute it a bit more. I did a lot of scrunching of the fabric and tried not to get too much mixing. I absolutely love the way that this piece turned out :) I love the colours and the tones :) I love how vibrant the colours are. I showed this at my quilt guild (to a few of the ladies) last night and they thought that I had purchased it so I guess that is a pretty big compliment :) Too mcuh fun! I think that I need to buy more PFD fabric :)
Friday, June 15, 2007
Bella Fiori Table Runner
Hi all;
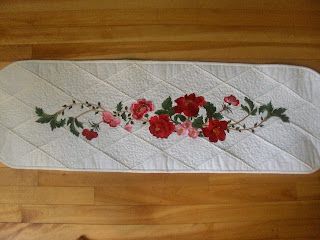
I am trying to be a better blogger :) Here is another project that my friend Sandy and I did together. We didn't want to take the whole summer off so we decided to do this Bella Fiori table runner together. It is from Creative Expressions Magazine, issue #11, and the embroideries are by Jenny Haskins. We could only see part of the table runner in the picture so we made our best guess to the rest of it. It is a really neat project with the way that the diagonal lines are done, with a 6 mm twin needle and the serpentine stitch on my Pfaff, first then the embroideries are laid down.
Here is a picture of the table runner from a bit more of a distance. We rounded the edges (you can see that a bit). The quilting is done after the backing is on but only in some of the squares. This makes the table runner lay really flat and adds a lot of interest I find.
I'll post a picture of my finished rose bouquet wall hanging once I get the binding turned to the back.
What do you think :)
Thursday, June 14, 2007
Rughooking
Hi all!
Long time no blog again but this time I can say that we went to the cottage and then I had a major computer melt-down :( I tried it again yesterday and it worked again :) So here I am :)
I started a new rug hooking project. I am doing a chair seat for a 150 year old chair that I stripped and re caned. I had to weave the cane by hand and it turned out wonderful. I have some more chairs to refinish and re cane and I plan on making chair pads for all of them. It will be a big project but I think that it will be worth it in the end. This is the first one that I am working on. It is out of scraps from the pumpkin rug that I made for my son.
The only thing that I am not sure of is the reddish plaid that I have started in the border. What do you guys think?
I didn't have enough of any one background type of wool so I over-dyed and off-white wool that I salvaged from a jacket using the onion skin dying technique. The wools on the left were the first ones that I did (with LOTS of onion skins in the pot), and, I thought that they turned out too dark for the background; but, they are perfect for the insides of the flowers.
The second set worked out really well for the background of the chair pad. I wanted some mottling but not a ton so these worked out well. Now to finish the chair pad :)
Sunday, June 03, 2007
This weekend
What a great weekend :) Two of our friends invited us to their friend's cottage for the weekend and what a great weekend it was :) I could get used to that :) I love the cottage life. I can just envision myself ina cottage. I could take my Featherweight and have a great time :) I didn't do any sewing at all and I relaxed on the dock. Life is good.
Friday, June 01, 2007
Update
Hi all! I hope that spring is treating you all well. I have been spending a lot of time outside lately of course. My garden is growing like mad and is making me very happy. I can just stand there looking at it :)
I haven't been doing much work for myself lately. I have been quilting for other people and trying to get all of that finished up.
Here's what's new for me :) This is my new sewing machine!! Isn't she a beauty?? This is the Pfaff Hobby Grand Quilter. It is a straight stitch sewing machine with a larger harp (throat) and does it ever sew fast and beautifully. It is a semi industrial machine and I will use it for machine quilting. I am loving using it and getting to know what it can do. I need to get my husband to build me another table so that I can sink this down into the table. Right now I am using it on top of my table and using the extension table.
Joyce asked if I got the stitch regulator and no I didn't. I have been machine quilting for several years now and I find that my stitches are pretty even without it. The machine already has a speed control so that is enough for me. I don't plan to use this on a frame but rather just sink it into a table and quilt like normal. Thanks for the question!
Subscribe to:
Posts (Atom)
2022 Christmas T-Shirt Quilt Gift
As promised - here is the T-Shirt Quilt Christmas Gift from 2022! I did share this on my Facebook page but not on my blog, (whoops sorry!) s...
-
It's GIVE-AWAY time! Now Closed To celebrate National Quilt Day I decided to hold a Give-Away!! I have the great pleasure to announ...
-
Hi everyone! Welcome to all the new viewers who are blog-hopping along with SewCalGal' s Fall Themed Accuquilt Blog Hop!!! Thanks Se...
-
Okay! Finally here is the sweatshirt jacket post :) I hope that you all like it. You can see a picture of my Halloween Jacket here and my...