Sunday, September 10, 2023

Binding Update

Hello my friend!

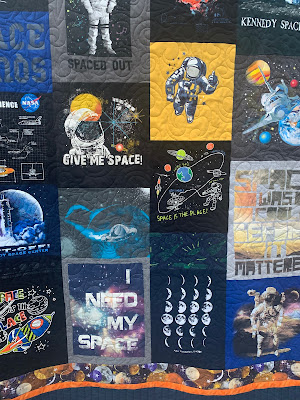
I'm motoring right along with my St. Patrick's Day T-Shirt quilt.  I took it off the frame a couple days ago and started to think about a binding.  Luckily I remembered that I way over-cut this Kona Parrot green fabric into 2 1/2" strips.  I don't bind at  2 1/2" - I prefer a 2 1/4" - but I really didn't relish the idea of cutting 1/4" off all the strips!

Luckily I have the 2 1/4" strip die for my AccuQuilt cutter.  I just laid them out, stacked a few strips high, and ran it through.


Perfect and so fast!  So little waste.  Someone actually seemed surprised to find out I still die-cut a while back LOL!  I asked them - still rotary cut?  They rolled their eyes at me - but seriously?  Why would I pick up a rotary cutter when I own the die and I have a bunch of strips to cut?


After cutting and preparing the binding I love using my Binding Babies to wind it and dispense the binding.  My favourites are always the limited edition ones that I get directly from the company - like my cute little vampire.  I have a bunch of these so I can leave my favourite colours prewound and beautifully displayed ;-)

Next up - I think I'll start a new Leaders and Enders project that I've been thinking about for a while - orange and grey.


I know - not everyone's cup of tea but I adore orange and grey together.  I'm thinking of an alternating orange and grey 16-patch and maybe a snowball or a star sashing with black points to make it into a fall sort of Halloween quilt.  

I'm honestly looking forward to getting back to straight up good-old 2" squares and no HSTs!

What do you think?  Grey and orange - yes or nay?
 

Friday, September 08, 2023

Quilting a Shamrock

 Hello my friend!

After we got home from the cottage I decided to get to work on my St Patrick's Day T-Shirt quilt.  I have some commission work to do and this one was already loaded onto the frame and ready to go.  I even picked Glide Celery thread for the top and bobbin.


So I decided to finish it up first.  Besides - I actually pieced a backing for this one from some left-overs and large pieces and I didn't want to load it again.  I really don't like taking a quilt off the frame when it's ready to go.  I don't know about you, but it takes me a while to get it loaded onto the frame and I hate to undo that work.

I decided on a simple straight-line piano key quilting in the border, but, for the body I wanted something more.  I sketched and doodled shamrocks for a good while on my white board (thank goodness for white boards!) until I came up with something that worked for me.  


I'm being vulnerable here so you can see the process :-) I realized that quilting the two side heart like a figure eight was the key to this process instead of going around it in a circle - right side, left side and then the top.


I made a video so you could see what I was talking about. 

It's a little long but I love watching people free-motion on the long arm.  Maybe you do too?

Let me know what you think and if you enjoyed my quilting video.

Happy Quilting!


Monday, September 04, 2023

The Split 9-Patch Centre is Complete!!

Hello my friend!
Thank you all to warm welcome back to blogging.  It feels good to be sharing in this format again. For a while I thought that social media would completely replace a blog - nope!  I was wrong.  There's something beautiful about this longer form of communication.  I know another that contributed to my lack of blogging was that I was trying to blog from my iPad - huge mistake!  It takes way too long.  I have a new Apple laptop and wow what a difference!

Yesterday we took my son to Trent University - and left him there!  :-o
That was hard and nerve wracking if I can be honest.  I had great plans to come home and get the final row done but it didn't happen.  Instead, we came home and chilled.  The campus is beautiful, right on the water and his housemates seem nice - so he's in good hands.

Instead I got up this morning and finished the last row in this Split 9-Patch quilt.  I went outside and sat at the water to pin the row.  This is always a big job in a Leaders and Enders quilt like this because there are so many points and seams.  This was a nice way to do the pinning ;-)


After sewing the last row on I had to see it out and wow!  I'm in love!  All this from the humble Split 9-Patch.


Look at how all the colours look like sparkles in the dappled light.  So many colours, and they all come together in the end.


With all of my L&E quilts I go through a hate stage.  I get to the point where I just want to throw it all in the garbage, donate it or just get rid of it somehow.  This job just seemed too big, too drawn out and, frankly, taking way too long.


Started in 2011 (when I purchased the 1.5" finished HST die) to having the centre finished in 2023.  This is actually a pretty big quilt.  I had to lay it out on a Queen sized bed to see how it lays and I'm so surprised to say it's actually dropping over the edge a few inches.


I was going to do a more elaborate border, but, now, I'm thinking a smaller first and a wider second border - simple.  No idea of the colour yet but I will be pulling from my stash.  Thoughts?


Sunday, September 03, 2023

Split Nine Patch Update!

Hi there!
If you follow along on my Facebook page you will have seen this picture of an old Leaders and Enders project.  I laid this out and realized that I only need two more blocks to be able to piece the last row and I have a lot of things already together - these last two blocks might just come together pretty quickly!


 Can you believe this was started in 2011 when I bought the HST die and first posted about it 2012!  Check it out! This quilt has been a long time in the making - here's an update from 2019.  

The biggest stumbling block - the off-white/cream/light-tan background fabrics.  I tend to buy a lot of an off-white and make projects from it but this project required so many different print scraps!  All the coloured prints - no problem I have bins of those - it's the background fabrics for me.

This quilt uses only two dies - the 2" square die

And the 1 1/2" finished half square triangle die

Hard to believe I know but it really is just all done using these two.  Of course you can do this without die-cutting, using traditional half square triangle (HST) methods.  And, of course you can do this in different sizes.  For example 2 1/2" squares and or the Value Die.  

I will be over-joyed to get this quilt done!  I'm still debating the border - kinda thinking about a first border and then maybe a 16-patch outer border?  I have lots and lots of those already pieced, but, it might be way too much.  Maybe a solid?

Thoughts?

Saturday, September 02, 2023

It's Been A Long Time!

Hello my friend!

It's been quite some time since I last blogged.  My husband pointed something out to me today.  He noticed that I haven't blogged since my Mother in Law (who was a quilter) passed.  Honestly - I didn't realize it, but, I haven't.  She used to read my blogs, and, chastise me for not blogging enough LOL!  When the blogging algorithm changed, my blogging became much more infrequent because I wasn't seeing the interaction I used to see, but I would put out blog updates.  Since she passed - not one post.  Sigh - I hope to change that.

Needless to say - I got the urge to blog today because I have an update on a post from allll the way back in April of 2012 I found this sewing cabinet on the side of the road for FREE!  You can check out the post for more details but this cabinet has been used as a table for over ten years!


I finally decided to bring it up to the cottage after 9 years of sewing on an old, uneven table.  I realized that the small insert area would perfectly fit my Pfaff Passport sewing machine and found the Sew Steady company that made custom inserts to fit cabinets and machine combinations - even this OLD Singer cabinet.


Why did I want to get an insert for this cabinet and not just buy a new one?  Sorry for the bad picture, but, can you sew what's under the machine??  A working hydraulic lift!  This is an excellent cabinet with a hydraulic lift, Serger area and it folds down!  It fits my Passport perfectly so no need to spend over a thousand dollars for a new one.


Check out how nice my set up is now!  Sew Steady was an excellent company to work with.  We had quite an extensive back and forth as I sent them measurements for a cabinet they hadn't seen before, and they searched for something that would work.  They eventually found a piece and made my insert and shipped it out promptly.  It's beautiful!  It's a thick piece of plexiglass and the cuts are beautiful.  I'm very pleased.  I'm not paid by them in anyway - just a happy customer.


This cabinet also folds down completely when I need to put everything away - when we have guests with small children running around ;-) and, the dark brown wood actually blends well with the cottage.  


I also decided to move my old sewing chair up here - soooooo much more comfortable than the rickety wooden one I was perching on before with my bum elevated by a pillow!  I think I'm getting serious about my quilting here now LOL!


Sew Steady also sent me this press on ruler - but I can't decide where to stick it!  Where do you stick yours?  Right in front?  On the front edge of the table?  Help a quilter out!

I'm so happy I finally decided to take the time and set myself up properly here.  I love sewing here at the cottage.  I just love it.  I just had to take the time to set myself up so my body would like it more.  So silly it took me this long - sigh.

I am pledging now - I will blog again!  I enjoy this and I hope that you enjoyed reading about my 11 year journey with this sewing cabinet :-D

Katrina


Monday, July 18, 2022

I Ripped!

 I ripped!

You had to know that I would do this.  I ripped the quilt again and added the two t-shirts to the quilt.  Thank you for your encouragement to do what I wanted to do.


I couldn’t resist and I think it looks so much better now.  There is less blank space and the last two t-shirts have now been added.


I’m so glad I went with my gut instead of my head on this one.  My head was saying - it’s fine.  My gut and heart were saying - you know you want to add those two blocks and it won’t take a lot of time - just do it!

That cardinal block is hand painted and hand embellished so how could I not include someone’s art into the quilt?

Now - I’m just contemplating adding borders to make it more of a bed size.  I have a couple flannels I’m going to put on the back, so it will be nice an cozy, now, I just need to decide if I add borders - my gut is saying a huge yes to borders.

Monday, July 11, 2022

Christmas T-Shirt Quilt - Take 2

Christmas Quilt - Take 2!
 A while back I posted this Christmas T-Shirt quilt I was working on.  This one is just for me.  No deadline.  Not a commission quilt.  Just for us.  I put it together over Christmas and i was never really happy with how it turned out.  


Specifically - I wasn’t happy with the entire bottom right hand corner and the bottom row.  I really didn’t like the way that I had the spacer fabric in there and a lot of negative space; so, I put it away and slowly thrifted a few more t-shirts.

On the weekend I realized that I had enough shirts to fix some of it, so I took it apart and added in some shirts.


I am so much happier with it!  It makes so much more sense now and looks so much better. UNTIL - I found a couple of the shirts that I had pulled out under my chair - sigh!  Just like me LOL!

Now I’m thinking about taking apart this section here and adding in the two fallen blocks and getting rid of a little more negative space.  


What do you think?  Do I rip and re-sew again or leave it?  Help!


Binding Update

Hello my friend! I'm motoring right along with my St. Patrick's Day T-Shirt quilt.  I took it off the frame a couple days ago and st...