Hi all;
I finished my UFO #14 last night :) I am really excited to have 14 out of my 33 UFOs finished and it is only the end of March. This is a Celtic table runner that I started in a course from Quilt University. It is a great way to do Celtic designs that is much easier than the usual way. I finished the hand quilting on it and got the binding on it last night. I love the way that the inserts look. They really add a great design element to it but since the runner is all batik fabric it was hard to hand quilt through since batik has a higher thread count. I really wanted to hand quilt this runner though, since it is all hand appliqued, so it was worth it. Now onto the next UFO.
This is my new purchase :) Yey! I finally got a rug hooking strip cutter. Yes I know that I can cut the strips with my rotary cutter but this is sooooo much easier. I got a great deal on this new Rigby cutter from a local quilt shop. I am building up a pretty large stash of recycled wools so it is a good idea to have something to cut them so that I can actually use them properly.
Speaking of rug hooking I got two GREAT DVDs by Gene Shepherd on learning to rug hook. If you are interested and can't find a class in your area this is a great resource. I took a class a couple of years ago and I learned so much from these DVDs. I also like that you can watch over and over again in case you forget something.
This is another rug hooking thrift store find if you can believe it :) This came in a kit with yarn and a small, and very flimsy looking, cutter. I got it for all of $1.00. I decided not to use the yarn, and since I have my new cutter, I cut some strips of a purple wool that I have and I am going to try it out with my own wool strips. It is just a small little pattern and I had to add leaders onto the sides so that it would fit into my Q-Snap; but, I think that it will be a nice little project to work on while I wait to get my new frame.
In the corner you can see where I was trying out some of my black and white plaid strips. They make a really cool effect I think.
Saturday, March 31, 2007
Friday, March 30, 2007
Springtime Fabric Post Cards
It's finally spring!! I don't know why I am so excited about spring coming this year but I am :) We had a very mild winter overall and not much snow but I am still glad that spring is finally here.
These are some fabric post cards that I just finished and mailed out this morning. It is part of a swap on the fabric cards yahoo list. There are 5 of us in this swap so I will get 4 nice springtime cards back. I hope that everyone likes these cards that I made. I did a machine embroidery on them that reminds me of spring.
The next swap that I am a part of is "Just Ducky: get your ducks in a row for the spring showers ahead" I think that I am going to to do a duck splashing around in the spring puddles. There are only three of us in this swap so I only have to make 2 cards. I wanted to find some fabric with rubber ducks on it but I couldn't find any. Oh well :)
Sunday, March 25, 2007
UFO #13 - the pumpkin quilt is Finished!
Hi all;
I finished my UFo #13!! This is the quilt that I pieced with my youngest son age 6. He picked all the fabric himself. As a matter of fact every time we would go into a quilt store and he would see a fabric with orange on it or pumpkins he would want a piece of it. LOL! A fabric addict already :)
I did the cutting on the quilt of course and we sewed this together with Gavin sitting on my lap. I had the 1/4" foot on with the guide and the finger guard for extra protection. It was really fun to do.
I decided to machine quilt the quilt myself since I thought that it would be just too hard to navigate the bulk of the quilt and the bulk of a 6 year old LOL!
When I asked Gavin how he wanted his quilt quilted he said that he wanted pumpkins in each block. So, I thought about it for a bit then I decided how I could do them continuous and without marking and this is what I came up with. I started on one side and made the body of the pumpkin then went back up and did the detail of the stem and the vines at the top. He is very happy with it :)
I was a little perplexed with how to do the pumpkin borders; but, Friday night I had a dream of how to make the pumpkins looked like like they were stacked on top of each other in the vertical borders and side by side in the horizontal. The trick was that I still wanted them to be continuous. I don't know if you can really see it but it is pretty neat looking.
I stayed up last night to finish sewing the binding on so that I could lay it over his bed while he was sleeping. This morning he got up and pulled it off his bed, along with all his pumpkin toys, and came downstairs. He has been playing with his quilt, and his pumpkin toys, for 2 hours so far with no signs of stopping :) This is the best thank you that I think that I have ever received from anyone. It just goes to show you how special a quilt can be to a little child and how much they love such a simple gift of a warm and cozy quilt. I think that this quilt will be loved way past being worn out.
GRS asked if my son got the pumpkin hooked rug as well since they seem to go together and the answer is yes! I hung it in his room on a wrought iron hanger. He has always thought that it was for him since the day that I brought the kit home so hey!
Joyce said that she couldn't really see the quilting so I uploaded a different picture. Hopefully you will be able to see the border quilting a bit better in this one :)
Thursday, March 22, 2007
More rug hooking
Hi all;
I thought that I would share this photo of my first rug hooking project. I took a class at my local quilt shop and bought this kit from the teacher. I found it so addictive to work on this. I finished this one a couple of years ago.
I think that I picked this particular project because my youngest son likes pumpkins so much; but, I also love the tiles around the border. I also really like the way that the pumpkin could be shaded and given a light source.
I finished this little rug that I was working on it before. this is another kit from the same instructor Loretta Moore. I just love the red in the cardinal and the way that he was holding the leaf in his mouth. I just finished putting the binding on the back this morning. Now I just have to find a place to hang it. It is now Spring technically so perhaps a winter wall hanging isn't very appropriate but I really think that it should be hung for a little bit before I change it to something else. What do you guys think??
I will be getting my new frame from Bee Creek Ltd. in April so I will be able to start my larger rug hooking kit then. I can't wait!
Tuesday, March 20, 2007
UFO #12 almost finished
Hi all;
I thought that I'd better post this picture now since one of these quilts is being sent in the mail today. This is UFO #12 just shy of being finished. I purchased this pattern of the Three Sisters mountains in Canmore Alberta when we were there this summer. I made one for us to keep and one to send out to our friends who let us stay in their house. It is just beautiful there and none of us wanted to leave. The quilts are quite small but they have a big impact. Anyways, I had these quilts pretty much all ready to go I just had to do the final cutting and fusing; and, then well, they got put away for several months! LOL! Really, the problem was that I needed some new sharper scissors before I could do anymore cutting. So, I got some new scissors and I finished the two quilts in just a couple of days. Now to get the binding turned to the back on the second quilt and they will both be completely finished! Yay!
Sunday, March 18, 2007
March Break Activities
Hi all!
This week was March Break here in Ontario. So I decided that this would be a good week to start the quilts that I had planned to quilt with my two sons. I counted these as two of my UFO's since the quilts have been cut out forever.
This is a picture of the quilt top that my youngest son (6) and I just finished. He was too short to be able to use the foot pedal even with a box under it so I had him on my lap while I used the foot pedal. I, of course, did all the cutting (and some fabric guiding). He picked out all the fabrics himself over the past year or so. He is a pumpkin nut! You can see my previous post about his love of pumpkins here. Any time that we would go into a quilt shop he would find the orange fabric, or pumpkin fabric, and want some. So we gradually collected more than enough for a quilt.
This is actually Gavin's second quilt. His first quilt was a preemie quilt that he made when he was four and he insisted on donated it :) You can see his quilt here.
My older son (8) is making a rail fence quilt of three colours. I'll post a picture of that too when he gets the top finished or even just the blocks done. He is able to use the 1/4" foot with the guide quite successfully. He really impressed me with his nice 1/4" seam! I think that we may just have another quilter in the family.
The thing that I find great about this experience is how they both said how much work it was to make a quilt :) They also thought that it has been really fun too; but, I think that they have a better appreciation for what I do. I also think that it is important to pass on our love of textiles and quilting.
Tuesday, March 13, 2007
I've been rug hooking again :)
Hi all;
Well I haven't been doing quite as much quilting as usual :) I've been rug hooking again. I really love doing this stuff. I love the whole process of it. This was a kit that I had purchased quite some time ago and am now finally getting around to. I didn't list this as a UFO because I hadn't started it yet. I wonder what you would call a kit that you have had for a while but not started. UFK maybe (unfinished kit)? Anyways, this is just a small project that I may turn into a pillow of I may leave it as a small table topper.
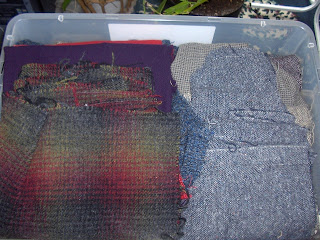
Our local opportunity shop was having a half price sale so I went in and cleaned them out of 100% wool jackets. I think that the men's jackets are the best that I've seen so far but I am a newbie at finding wool.
I ordered a rug hooking gripper frame from Bee Creek Ltd which should be here in April. I can't do anything larger than about 14" in my Q-Snap frame so any larger project really does require a better set up. I love rug hooking enough so I thought that a frame would be a good investment. Next I just need to find a reasonably priced cutter.
Speaking of thrift store finds, This is a complete rug hooking kit that I found at my local opportunity shop for only $5.00!! Regular price on it is $65.00 USD! Someone had already started it and I guess they decided that they didn't like it. It's for a half-circle house and flowers and it contains all of the wool strips needed. It also had a hook in it too. It was a different hook from what I have so I was happy with that find as well. Actually, as another second hand find, I got another hook for $0.25. Considering that the hooks cost at least $8.00 new I'm pretty happy to find them :)
Sorry this wasn't a quilting post but at least it is textile related :) Do any of you rug hook as well?
Sunday, March 11, 2007
UFO Finish #11
Here it is UFO #11!!
This small wall hanging is made from a left-over block from my sampler that I am hand quilting right now. The sampler is also on my UFO list but maybe it should be a WIP. Anyways, the half-square triangles around the outside are leftovers from the saw-tooth border on the sampler and the borders are also left-overs. I thought that this little quilt would look great on a side table or on the wall once my sampler is on the bed.
Here is my WIP sampler quilt. I have been working on this quilt for years now. i bought the fabric about 4 years ago and started the blocks. I had all 20 blocks finished about 3 years ago but I couldn't decide what to put for sashing. I purchased about 3 different potential fabrics and didn't like any of them once I saw them with the blocks. I finally decided on the red Moda fabric and went with it. Luckily I had enough to use for the sashing. The only thing was I had a bunch of the red half-square triangles already made and ready for the saw tooth border. Well since that just wouldn't look very good next to the red sashing they got put into the little wall hanging that I just finished.
Here is another quilt that was made out of the same fabric line. As you can see I waaaaaay over-bought this fabric line LOL! The orange border print was a potential sashing fabric that I decided I really didn't like. I made all the flying geese out of scraps from my sampler using the Eleanor Burns method for flying geese. I just love her method!
You might remember this quilt since it was the subject of my very first blog post :) I was laying out the quilt at that time, here's the top finished, and here it is finished :) We hand quilted the quilt in the bee that I belong to called The Silver Thimbles. I love the way that the corners turned out using more 2" squares. I love using 2" squares! They can really add to a quilt and use up scraps.
Wednesday, March 07, 2007
Happy March everyone!
Hi all! Sorry I haven't posted in a little bit :) I have been working on a few projects as always but i can't show them here :( Sorry! One of the projects that I am working on is my challenge quilt for our quilt guild. I know that a few people from my guild read my blog so I'm not going to post a picture of that quilt for a while.
I have also been working on another embroidery quilt with a friend of mine. It is another Jenny Haskins embroidery that looks like a big bunch of red roses. It's turing out really nicely :) It's fun to work ojn a project with someone but yet be doing your own project at the same time. Linda asked if the designs were hand or machine embroidery and they are machine embroidery. I have VERY limited skills with hand embroidery and a wonderful machine that will do it for me :)
I have also been hand quilting another UFO! It is just a small little wallhanging but it was completely pieced over a year ago and then just left to sit there LOL! Well I have 10 out of 33 UFO's finished for the year. When I finish this one I will be 1/3 of the way through my UFO's!
Subscribe to:
Posts (Atom)
2022 Christmas T-Shirt Quilt Gift
As promised - here is the T-Shirt Quilt Christmas Gift from 2022! I did share this on my Facebook page but not on my blog, (whoops sorry!) s...
-
It's GIVE-AWAY time! Now Closed To celebrate National Quilt Day I decided to hold a Give-Away!! I have the great pleasure to announ...
-
Hi everyone! Welcome to all the new viewers who are blog-hopping along with SewCalGal' s Fall Themed Accuquilt Blog Hop!!! Thanks Se...
-
Okay! Finally here is the sweatshirt jacket post :) I hope that you all like it. You can see a picture of my Halloween Jacket here and my...